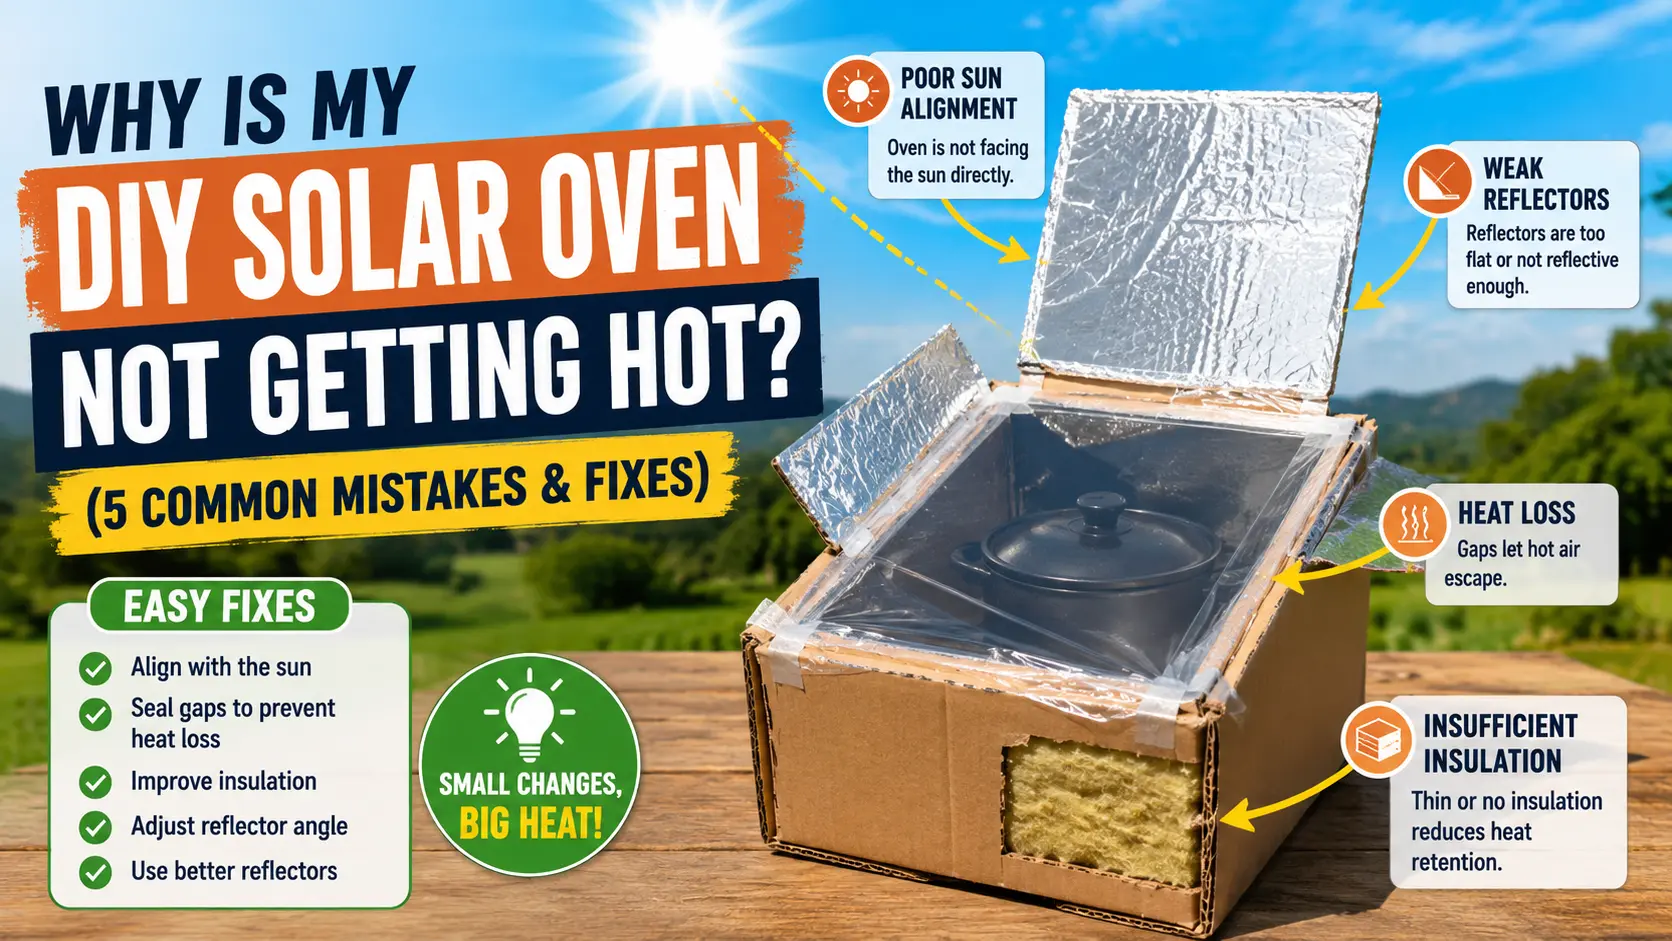
DIY Solar Oven Not Getting Hot? You’re not alone. Many DIY solar oven builders find their cooker struggles to reach high temperatures because of a few common mistakes. Fortunately, most of these problems are easy to fix.
Building a DIY solar oven is one of the most rewarding, eye-opening projects you can take on. It’s a brilliant way to see physics in action, teach kids about renewable energy, and cook a meal using nothing but pure sunlight.
But I’ll be the first to admit: it can also be incredibly frustrating when things don’t go as planned.
DIY Solar Oven Not Getting Hot? Here’s Why
There is nothing quite like the disappointment of setting up your handmade cardboard cooker, checking on it an hour later, and realizing the temperature has barely nudged past lukewarm. If your DIY solar oven is struggling to get hot, don’t give up just yet! Over the years, I’ve built quite a few of these with various materials, and I can tell you that a low temperature is almost never a failure of the sun itself. Usually, it just comes down to a few minor design tweaks or setup mistakes that are incredibly easy to fix.
Understanding exactly how these little ovens trap energy—and making a few simple adjustments—can turn a sluggish cooker into a high-performing solar machine. Let’s look at the five most common reasons a DIY solar oven stalls out, and exactly how to fix them.
If you are still building your solar cooker, it is important to start with a design that captures and retains heat effectively. Our guide on How to Build a Cardboard Solar Oven for Under $5 shows you how to create an affordable solar oven using simple household materials while maximizing cooking performance.
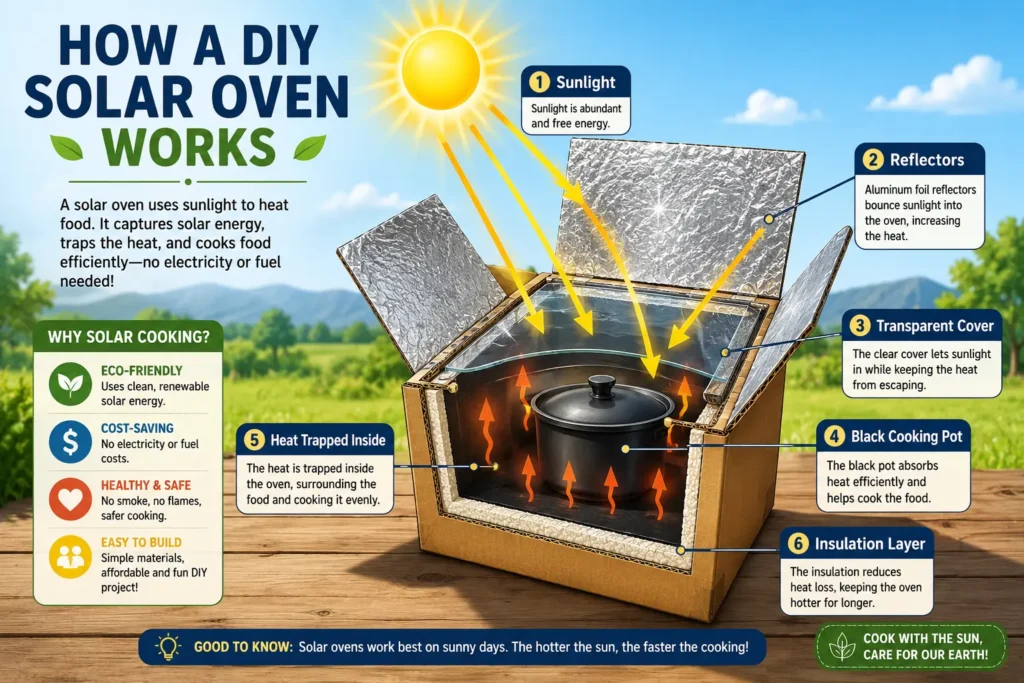
How Does a Solar Oven Work?
To understand where your heat is escaping, it helps to look at a solar oven as a miniature ecosystem of heat transfer. A successful DIY design relies on four core elements working in perfect harmony:
- Reflectors: Shiny surfaces that intercept sunlight and bounce it directly into the oven chamber.
- Absorption: A dark interior surface that catches that light energy and converts it into thermal heat.
- The Greenhouse Effect: A transparent cover (like glass or plastic wrap) that lets light in but blocks the converted heat from floating away.
- Insulation: A protective barrier that keeps the trapped heat inside the walls rather than letting it bleed into the outside air.
When these four elements align, even a basic cardboard oven can reach impressive temperatures between 80°C and 150°C (175°F–300°F). If your oven is underperforming, one of these pillars is likely out of balance.
Mistake #1: The Solar Oven Is Not Facing the Sun Properly
Why It Happens
Solar ovens rely entirely on direct, concentrated sunlight. Because the sun feels so bright on a clear day, it’s easy to assume that just having the oven “out in the open” is enough.
However, many beginners position their oven once and leave it there for hours. The sun is constantly moving across the sky, meaning the angle of the incoming light shifts. If your oven isn’t actively tracking that movement, much of your potential cooking power reflects right back out or hits the outside walls instead of the interior.
How to Fix It
- Track the Sun: Adjust the physical position of your oven every 20 to 30 minutes to keep it aligned.
- The Shadow Test: This is my favorite old-school trick. Look at the shadow your solar oven casts on the ground. When the oven casts the smallest, most symmetrical shadow possible, it means it is pointed directly at the sun.
- Elevate the Base: Depending on the time of day or your global location, you may need to prop up the back of the oven with a brick or a piece of wood to angle the opening up toward the sky.
Pro Tip: The more direct sunlight entering the cooker, the higher the temperature will be. Think of yourself as the captain of a ship—frequent, small adjustments keep you on course.
Mistake #2: Wrinkled or Misaligned Reflectors
Why It Happens
Reflectors act like a funnel, gathering extra sunlight from a wider area and forcing it into your cooking chamber. If your reflective material is dull, heavily wrinkled, or poorly angled, that extra energy is completely wasted.
When gluing aluminum foil down to cardboard, it’s easy to accidentally create a crinkled, textured surface. Instead of a sharp, concentrated beam of light, wrinkled foil scatters the sun’s rays in a dozen random directions—most of them missing your food entirely.
How to Fix It
- Smooth It Out: When building, use a soft cloth or a squeegee to smooth out aluminum foil as you adhere it. If you want a massive upgrade, look into cheap, highly reflective emergency Mylar blankets instead of kitchen foil.
- Choose the Right Glue: Avoid water-based glues that wrinkle paper. A thin layer of spray adhesive or rubber cement keeps the foil perfectly flat.
- The Target Check: Stand directly in front of your cooker (wear sunglasses!) and observe where the reflected bright spots are landing. If the glare is hitting the outside dirt or the top rim of the box, adjust the tilt of your reflector panels until the concentrated light bounces straight into the bottom of the cooking chamber.
Mistake #3: Heat Is Escaping Through Tiny Gaps (The “Glazing” Gap)
Why It Happens
Your transparent window (whether it’s heavy-duty plastic wrap, a plexiglass sheet, or a pane of glass from an old picture frame) is supposed to act like a greenhouse. It lets short-wave sunlight enter, but blocks long-wave heat from escaping.
Air is highly efficient at carrying heat away. If your plastic wrap is loose, or if there is a gap where your glass lid rests against the cardboard box, hot air will steadily escape. It’s like turning on the heater in your house with the window cracked open—your oven will never reach peak temperature.
How to Fix It
- Seal the Edges: Use painter’s tape, masking tape, or silicone weather stripping to seal down the edges of your plastic window.
- Create a Double Wall: If you are using plastic wrap, try creating a “double-pane” window by sealing one layer of plastic to the inner lid and another to the outer lid, leaving a pocket of dead air in between. This drastically boosts performance.
- The Heat Leak Test: Once your oven has been in the sun for 15 minutes, hover your hand just above the edges of the window. If you feel a distinct draft of warm air radiating against your skin, you’ve found a leak that needs sealing.
Mistake #4: Insufficient or Wrong Insulation
Why It Happens
Collecting heat is only half the battle; keeping it is where the real cooking happens. Without proper insulation, the heat your dark interior absorbs will instantly bleed right through the cardboard or plastic walls and disappear into the surrounding air.
Many simple DIY designs skip insulation entirely to save time, resulting in an oven that gets warm to the touch on the outside but fails to cook anything on the inside. Furthermore, using the wrong insulation can cause issues—some plastics can melt or release toxic chemical fumes when exposed to high heat.
How to Fix It
- Pack the Walls: Build a “box-within-a-box” design and tightly pack the gap between the inner and outer walls with safe, accessible insulators. Crumpled newspaper, shredded cardboard, cotton fabric rags, or natural wool work beautifully.
- Keep It dry: Ensure your insulation stays dry. If moisture leaks into crumpled newspaper, it loses its ability to trap air and stops acting as an insulator.
Pro Tip: Think of insulation as a winter jacket for your solar oven. The thicker and more trapped air it contains, the warmer the inside will stay.
Mistake #5: The “Thermal Mass Trap” & Wrong Cookware
Why It Happens
This is a massive hidden trap that catches a lot of first-time solar chefs. Let’s look at two critical errors involving what you put inside the oven:
- Shiny or Reflective Pots: If you put a shiny stainless steel pot or a bright aluminum pie pan into your solar oven, it acts like a mirror. It bounces the hard-earned sunlight right back out of the box instead of absorbing it.
- The Thermal Mass Trap: Putting a massive, heavy ceramic casserole dish or a thick cast-iron pot inside a lightweight cardboard oven can stall your temperatures completely. A cardboard solar oven has limited power. If you give it a giant, heavy pot, the oven will spend two hours just trying to heat up the ceramic material of the dish, leaving no energy left to actually cook the food.
How to Fix It
- Go Thin and Matte Black: The gold standard for solar cooking is a thin-walled, lightweight metal pot painted matte black on the outside. Thin metal transfers heat to the food instantly.
- DIY Your Cookware: You don’t need to buy anything expensive. Take an old thrift-store metal pot, or even a glass mason jar, and spray paint the outside with a non-toxic, high-heat matte black paint (the kind used for backyard BBQs).
- Keep It Shallow: Spread food out in shallow containers rather than a deep, dense pile so the heat can penetrate efficiently.
Additional Environmental Factors to Mind
Even with a flawless design, nature plays a massive role in your success. If your oven isn’t performing, take a quick look at the environment:
- Humidity and Thin Clouds: You need crisp, direct shadows. High humidity or thin, milky “cirrus” clouds scatter light waves. Even if it feels bright out, invisible atmospheric moisture can cut your oven’s efficiency by 30% or more.
- The Wind Factor: A stiff breeze acts like an air-conditioner running over your outer cardboard shell. If it’s a windy day, set up a simple windbreak using extra cardboard boxes or place your oven in a sheltered alcove of your garden.
- The Golden Hours: The ultimate sweet spot for solar cooking is between 11:00 AM and 2:00 PM. This is when the sun travels through the least amount of Earth’s atmosphere, delivering pure, unadulterated thermal energy.
Quick Troubleshooting Checklist
Before you head back to the drawing board, take your oven outside and run through this quick mental checklist:
| Check | Troubleshooting Question |
| ☀️ | Is my oven casting the smallest shadow possible right now? |
| 🪞 | Are my reflectors smooth, clean, and aiming glare directly onto the pot? |
| 🪟 | Can I feel any warm air escaping around the edges of my plastic/glass seal? |
| 📦 | Are the walls thick, insulated, and dry? |
| 🍳 | Is my pot lightweight, thin, and painted matte black (not shiny)? |
| 🪵 | Is my pot sitting flat on a dark base, rather than a heavy ceramic plate? |
Final Thoughts
At the end of the day, solar cooking is a beautiful exercise in patience, observation, and experimentation. If your first attempt didn’t bake a perfect tray of cookies, don’t sweat it. Treat it like a science puzzle!
Most of the time, simply swapping out a shiny pot for a black one, smoothing out a wrinkled reflector, or taping up a tiny air leak will instantly reward you with a massive jump in temperature. Keep tweaking, keep adjusting, and enjoy the incredible feeling of cooking a meal using nothing but the sky above you.
Troubleshooting a solar oven is more than just fixing a project—it is also a valuable learning experience. Students can explore concepts such as renewable energy, heat transfer, insulation, and solar radiation. Learn more in our guide on Educational Value of DIY Solar Cookers (Step-by-Step Guide).
Frequently Asked Questions (FAQ)
What is the absolute highest temperature a DIY cardboard solar oven can reach?
Under absolute peak conditions—a perfectly clear summer day between 11:00 AM and 1:00 PM, with thick wall insulation and a tightly sealed double-pane plastic window—a well-built cardboard box oven can reach 120°C to 150°C (250°F to 300°F). However, for everyday DIY setups, a consistent temperature of 95°C to 110°C (200°F to 230°F) is much more common and is still perfectly hot enough to slow-cook most foods.
Can I use a DIY solar oven on a cold but perfectly sunny winter day?
Yes! Solar ovens rely on light energy (radiation), not the ambient outside air temperature. As long as the sky is crystal clear and your oven is highly insulated to prevent the freezing winter air from chilling the outer walls, you can successfully cook in the winter. Just keep in mind that because the sun sits lower in the sky during winter, you will need to tilt your oven forward significantly more than you would in the summer.
Is plastic wrap safe to use as a window, or will it melt and release toxic fumes?
Standard grocery store plastic wrap (usually made of low-density polyethylene) is generally safe for basic DIY ovens because it has a melting point around 105°C to 115°C (220°F to 240°F). However, if your oven performs exceptionally well, standard wrap can soften or sag. For peace of mind and better durability, I highly recommend using clear oven roasting bags (like the ones used for baking turkeys). They are designed to safely withstand temperatures up to 200°C (400°F) without melting or off-gassing.
How long does it take to cook food in a DIY solar cooker compared to a kitchen oven?
As a general rule of thumb, solar cooking takes about twice as long as a conventional kitchen oven. Because a DIY solar oven operates at lower, gentler temperatures, it functions much more like a kitchen slow-cooker (Crock-Pot). For example, a batch of solar cookies that takes 10 minutes in your kitchen might take 25 to 30 minutes in a solar oven. The upside? It is incredibly forgiving, and it is almost impossible to burn your food!
Do I need to put water in the pot when cooking rice or vegetables?
You actually need significantly less water than normal. In a standard kitchen stovetop pot, a massive amount of water escapes as steam. But inside a sealed solar oven pot, moisture cannot escape. It rises to the lid, condenses, and drips right back into the food. For vegetables, you often don’t need to add any water at all. For grains like rice, reduce your usual water ratio by about 15% to 20% to prevent it from turning mushy.